Oh my goodness. This lesson was amazing. Students were not only engaged but having so much fun! We learned about the famous photographer William Wegman who captured his dogs in interesting ways. Sometimes he would dress them up as humans, have them pose with a prop, or shoot videos of them that were aired on shows such as Sesame Street. I showed them several example of photographs and videos while the kids smiled, laughed or pointed out how unique the artist's thinking was. Their goal for this project was to place a dog in an unusual or comical situation, creating a parody. We spent the first day simply cutting out as many dog heads as we could find in magazines. These would all be put into a huge pile for everyone to pick from. The dog heads had to be medium to large to work well for the project. The next day was used for the students to brainstorm and sketch out their idea. They were allowed to use 2 dog heads in their picture if they wanted. Once their sketch was approved by me, they could pick out their dog heads, glue them on their paper, and start drawing the scene around it. Their ideas impressed me and they made for such a great hallway display.
Tuesday, November 8, 2016
Pete the Cat
I started the beginning of the year with Kindergarten by doing a project based off a book they already know and love. We read the book and sang the song and talked about what colors make up Pete the Cat. I was able to work in the primary colors this way because of course his body is blue, his eyes are yellow, and his guitar and shoes are red! Yay! This made it easy for them remember the colors :) I did a step by step demonstration of how to draw Pete, students painted him in, cut him out and then glued him onto a yellow piece of background paper. Fun little music notes were added for detail.
African Kente Cloth
This year our school is going global which means each grade level is assigned a part of the world to study. Because of this, I will be teaching as many multicultural lessons as I can. I'm loving this opportunity to grow and expand my art knowledge. Since 3rd grade is studying Africa, I decided to start with a fun weaving lesson. Kente Cloth originated in Ghana and is known for it's elaborate pattern and colors. Kente cloth is worn for celebrations such as weddings, graduations, ceremonies, etc. and can tell a story by its colors. We talked about what each color represents in their culture and then students brainstormed what colors they would choose to represent them as an individual. This is the list of meanings I provided them with:
Red/Orange: Strength
Grey: Healing & cleansing
Black: Maturity
Gold: Wealth & success
Pink: Gentle & sweet
Purple: Protective of others
Blue: Love & harmony
Yellow: Beautiful & royalty
Green: Growth & nature
White: Purity & healing
We used several days weaving different colored paper strips. Some colors were added on top of others for pattern. Once completed, students turned it over to the back and taped up the sides to hold it all together. Small pieces of black string were added to the ends for a cloth like appeal.
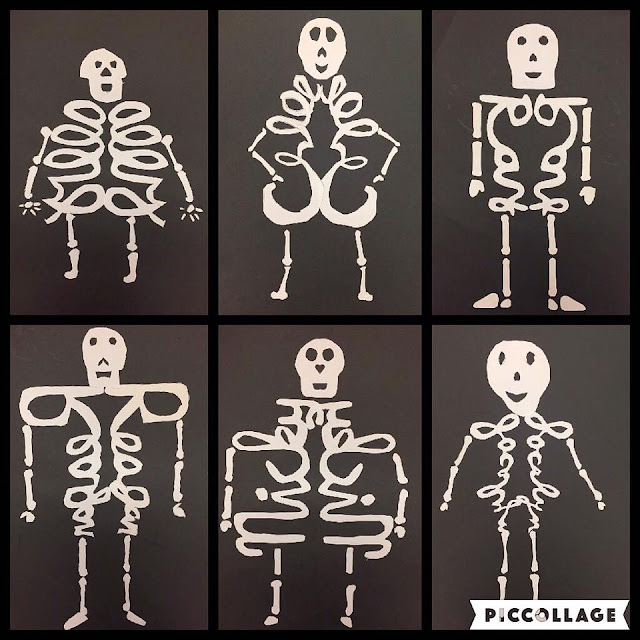
Name Skeletons
I saw this project on the Pinterest and decided to give it a go. Let me start out by saying, it was very challenging for some students. Luckily, with a lot of one on one help, we got it all done! We talked about symmetry for this lesson as well as positive and negative space. To create symmetry for the skeleton's ribcage, students had to write their name in bubble letter-cursive on a folded sheet of paper. I gave them cursive alphabet sheets as a guide and we spent a good 2 days getting this part done. Students struggled with writing their letters too skinny of small so I really had to emphasize that these were to be thick bones for our skeleton. The next job was to cut out their name with the paper still folded, so that would have two pieces. Again, this was very tricky for some because it was such intricate cutting work. I had to help some kids cut the circles out from some of their letters. They then glued down both their names in the center of a big black sheet of paper, making sure that the same letter was touching. Some names are read from the top to bottom and some read from the bottom up. The last class period was used to cut out the skull, arms, legs, hands and feet. Some students opted for the mitten hands and some took it a step farther and made individual fingers. I know the kids were relieved to be done but extremely proud of their work.
Frankenstein Monsters
What better way to celebrate Halloween then to make Frankensteins in art class? The little one's definitely enjoyed making these. I found a kid friendly story and video on Frankenstein for the kids to watch on YouTube and then we talked about the different shapes that make up his face. To start their collage, they chose a shade of green for their monster as well as an orange or purple paper for the background. The rest of the details were added with scrap paper and Sharpie. The results are mighty scary...and cute!
Subscribe to:
Comments (Atom)


