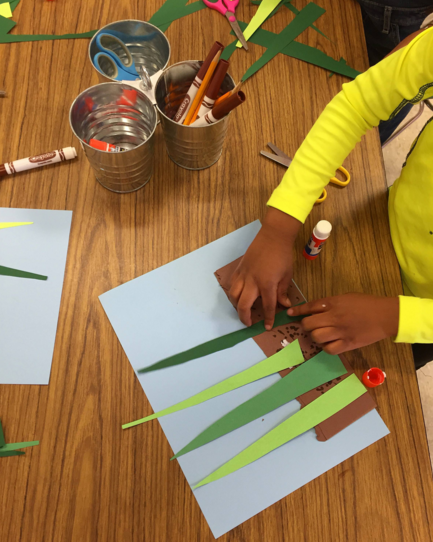
1st graders are currently studying Asia so we made some panda bears in art class! I began the lesson by sharing a few interesting facts about them and then we watched a short educational Youtube clip about them. I also read the book Zen Shorts because it features a very wise panda bear. For the first day of the project students got a bright red paper for their background. Then, they were given a sheet of black paper to draw a big hill for their panda bears body. This was then glued down to the bottom of their red paper. Next, students cut a a large circle from a piece of white paper to glue down for their panda's head. A smaller piece of black paper was handed out to cut out half circles for their panda's ears. The next day students added black ovals for eye spots and eyeballs. A white tummy was added and then little black arms. A Sharpie was used to make black dots in the eyes and a mouth. The last day was used to make bamboo for their panda. Long strips of light green paper were glued to their background. They even got to add a smaller piece in the panda's hand if they wanted. Little dark green leaves were added and then a green oil pastel was used to draw lines on their bamboo.
Showing posts with label 1st Grade. Show all posts
Wednesday, March 29, 2017
Australian Koala Bears
Kindergarten is currently studying Australia so I thought it was fitting that we create some cute and cuddly koala bears. I started the lesson by sharing some interesting facts about koalas and showing them a short YouTube clip about them. I then read them the book Koala Lou. They pointed out the different features of koalas, their big ears and nose, grey fur, sharp claws, etc. On the first day every student got a grey piece of paper. They then drew a large oval for the body, and two half circles for the ears. I showed them how to add white paint inside the ears, for the eyes, and some for the mouth. This was left to dry. The next day students cut out their koala shape and glued it onto a dark blue piece of paper. A long strip of brown paper was added for a tree branch and then they cut leaves from green pieces of paper. They also used black paper to cut out a big oval for its nose. On the third day, students were given more grey paper to cut an arm and a leg for the koala. These were glued so that it looks like the koala is holding onto the tree. Finally, a Sharpie marker was used to add the black dot in the eyes, a mouth, and claws.
Christmas Tree Forests
Kindergarten and 1st graders created these Christmas tree forests right before Christmas break. We started by painting a snowy ground on a blue piece of paper and then used cue tips to make snow falling from the sky. The next day was used to mod podge different shades of green tissue paper to a half sheet of white paper. The last day was used to cut out long triangles from the green paper, and glue down to our background. Short brown rectangles were added for the tree trunks. This makes for a simple and beautiful winter project their parents are sure to frame!
Artist Self Portraits
This became one of my new favorite lessons to teach. I might just do it every year from now on for Kindergarten. What better way to make them feel like genuine artists then to draw themselves as one! We talked about what a self portrait is and then did a full body exercise for the students to become aware of the parts of us we have to draw. For example, we began by standing beside our seats straight and tall and touched the top of our head. We then touched our ears and felt down to our neck. We noticed how our shoulders come out from our necks and how our arms hang down past our hips. We patted our thighs with our hands to notice their length and then touched our knees and touched our toes to point out how long our legs are. I then passed out paper and demonstrated how to start drawing a face and body for our self portrait. Students added the extra details such as their face and outfit themselves. I traced their self portrait drawings in Sharpie and the next week they colored them in. The next part of their project was to make a mini easel out of popsicle sticks and to draw and paint a tiny picture to put on top. They used their favorite color as the background.
Tuesday, November 8, 2016
Pete the Cat
I started the beginning of the year with Kindergarten by doing a project based off a book they already know and love. We read the book and sang the song and talked about what colors make up Pete the Cat. I was able to work in the primary colors this way because of course his body is blue, his eyes are yellow, and his guitar and shoes are red! Yay! This made it easy for them remember the colors :) I did a step by step demonstration of how to draw Pete, students painted him in, cut him out and then glued him onto a yellow piece of background paper. Fun little music notes were added for detail.
Frankenstein Monsters
What better way to celebrate Halloween then to make Frankensteins in art class? The little one's definitely enjoyed making these. I found a kid friendly story and video on Frankenstein for the kids to watch on YouTube and then we talked about the different shapes that make up his face. To start their collage, they chose a shade of green for their monster as well as an orange or purple paper for the background. The rest of the details were added with scrap paper and Sharpie. The results are mighty scary...and cute!
Friday, July 29, 2016
House Weavings
This was the weaving lesson I chose to do with the small ones this year. The first day of the lesson was used to make the paper background. They picked a color blue for the sky and a shade of green for the grass. They then added a sun and clouds to they sky. The following day was used to make the actual house weaving. I let them choose two different colors and demonstrated slowly how to weave the strips. It always seems that half the kids get it right away and the other half struggle a lot. I always have the kids who understand it really well to help the ones who need it. Once they completed their weaving they got to add a roof, door, and windows. I will definitely be repeating this lesson in the future! They are so adorable :)
Thursday, July 28, 2016
Blowing Kisses on Mother's Day
Okay so this project was inspired by something similar I saw online. Can't remember where I saw it but I changed it a bit and tried it out with my little ones. Mother's Day was coming up and I wanted the students to have something really sentimental to give to their wonderful mommies! I took a photo of each Kindergarten and 1st grader blowing a kiss to the side. This was harder for some kids to do than others but we made it happen, haha. I printed them out in black and white relatively small and glued them in the bottom corner of a white piece of paper. This was a lot of prep time on my part but so worth it. On the first day of this project we talked about why we love our moms, what they do for us, and what we wanted to say to them on Mother's Day that would make them smile really big. Then we used oil pastels to draw hearts coming from our lips and hands to represent our 'kisses.' Red, pink and purple liquid watercolors to make a splashy background. While it was still wet, we used glue and glitter to make it ever more special. Having the kids pinch and sprinkle over a bucket didn't cause too bad of a mess luckily. The next day was used to add special messages to our mom. I printed out some of the most popular phrases I heard from the kids and they chose one to glue onto their paper.
Corduroy Bears
One of my favorite childhood stories was definitely about Corduroy the bear. I was surprised to learn only a few kids recognized the book! Once I read it to them, they loved it as much as I did :) We created our own Corduroy bears showing different kinds of texture. We used gold paint for the bear and green construction paper for the overalls. Each student got a small piece of cardboard to dip into a darker green paint to make a corduroy effect on the overalls. We also used gold oil pastels to add fur around the outside of our bear. Students picked out a color for the background as well as 2 buttons for me to hot glue on their picture. I love the results!
Tuesday, March 22, 2016
Roaring Lions
Kindergarten and 1st graders studied safari animals this week in art class! They really loved looking at the different colors, patterns, feathers, and horns of different animals. For their painting project we focused on lions. More specifically, male lions since we would be doing big colorful manes. Students also learned about and used neutral and warm colors through this lesson. We mixed brown and white to make the face color and used red, gold, yellow, orange and brown to make streaks for the mane. They loved that their lions are roaring! I love this project because they turn out cute no matter what.
Catching Snowflakes
I wanted to think of a cute project to hang for the Winter Extravaganza concert and this seemed too perfect. I did this with Kindergarten and 1st grade. To begin the lesson, we read a few books about snowflakes and acted out how we would catch them with our tongue. The face and sweater were cut from construction paper. I'm so glad I had the multicultural colored paper for the kids to choose from for their faces. I loved seeing all the different shades displayed! I let them choose through a bunch of cute patterned paper for their scarf. The rest of the face details were added with oil pastels. I must admit, the kids were a little confused why the faces didn't have eyes, despite my attempt of acting out catching a snowflake, haha. I kept reminding them that if we were looking up, our nose is up top and our mouth is wide open, but eyes our nowhere to be seen. The students did enjoy learning how to draw a simple snowflake shape with white oil pastels for the background. Splotches of blue paint were added for fun.
Tuesday, December 29, 2015
Thanksgiving Turkeys
There is always time before holiday breaks where I need to do a quick and simple lesson to fill time. In this case, I decided to do a simple turkey drawing with Kindergarten and 1st grade. They followed my demonstration so well and I was pleased with all the colors they chose to decorate their turkeys!
Tissue Collage Self Portraits
This was Kindergarten and 1st grade's first attempt at drawing themselves in the art room. We first looked at a couple of famous self portraits from the artist Frida Kahlo and Vincent Van Gogh. Students pointed out interesting things in the paintings such as that the artists included things they loved (Van Gogh including paint and paintbrushes and Kahlo including her pets.) We also discussed the reasons one might have for creating a self portrait. Before we got started on our art, we did a little standing up exercise to get to know our bodies better. I had them stretch their arms to the air, feel how their shoulders come out from their neck, find out where their elbows and fingers stopped on their sides, touch their feet, etc. This got them thinking about placement. I told them we would be drawing a full body self portrait. Once they sat down and had a sheet of paper in front of them, we started with our heads at the top of the paper. I gave them sample sheets of how to draw hair, eyes, nose, and mouths. They liked having the different options to choose from. We then drew everything step by step all the way down to the feet. Students were given free reign on how to design their outfit, shoes, etc. They were given a Sharpie to trace and sign their name on the side of their self portrait. These were cut out bubble style and glued down onto a tissue paper background completed the next week. To make this project a fun momento for their parents, I had them fill out a little "About Me" paper on the back asking how old they were, what their favorite color and animal was, etc. How fun will they be to look back on in 20 years?
Mondrian Designs
This was my first time teaching Piet Mondrian and now I'm wondering why I hadn't done it sooner. He is PERFECT for Kindergarten and 1st grade. I was amazed by how much they connected with his art. We looked at several of his works as well as a YouTube clip that brought the famous Broadway Boogie Woogie painting to life. I asked the children what his artwork reminded them of and I got an overflow of answers. Many students saw train tracks, streets, jail cells, Mine Craft, parking spaces, etc after staring for a few moments. I also told them how much the artist liked jazz music so we listened to a compilation of popular jazz songs while we worked on our art. The first thing I had them do was to glue down skinny rectangular strips of black paper onto a piece of white paper to create a unique design. The only rule was that the lines had to either run horizontally or vertically. I love how every child gets this same direction but each one came out so wonderfully different! The next day the students learned about the primary colors and used these to paint in a few spaces from their designs. They were told to leave a few white spaces if they wished.
Lady Bug Life Cycle
I read a book about the life cycle of a lady bug to Kindergarten and 1st grade for this lesson. There was a fun section in the back of the book that allowed them to but the steps in correct order. By the end they were pumped to create their own lady bug art! We started by placing a wavy brown piece of paper onto the bottom of a blue sheet of paper. Then they used a brown marker to create dirt dot texture to it. Next came the grass! I put several shades of green paper strips onto each table and demonstrated how to cut long skinny triangles from them. Two pieces of grass could come from one green rectangle if cut correctly! They cut as many as they wanted and then glued them down. Students cut their own medium size circles from red paper for their ladybugs and glued them down onto their background. I told them they could be crawling on the dirt, crawling on the grass or even flying in the sky! The last step was getting a black marker and adding polka dots and little legs to each one. Arn't they adorable?!
Sunday, October 18, 2015
Wayne Thiebaud Gum Ball Machines
Students learned about the artist Wayne Theibaud and his famous dessert paintings. For this project, we were inspired by his gum ball machines. The first day was spent printing different colored gum balls onto a white circle. To create ours, we used some cute circle sponge printers I found at Michael's that worked PERFECTLY. I passed out a small dish of paint on each table with 2-3 sponges each. Each table had a different color to start with and then they were rotated around so that eventually all colors were used by each student. For each color they did 4 balls. I had to really emphasize sharing and waiting their turn. Surprisingly, they handled it super well. The next day was spent constructing our gum ball machines with pieces of paper. I demonstrated which piece went where. The last step was giving them a Sharpie and having them write 25 cents on the front.
Sunday, September 13, 2015
Laurel Burch Cats
Students learned about the artist Laurel Burch and her unique style of painting. I love teaching about this artist as she showed such positivity and love for life despite her bone disease. I demonstrated step by step how to draw a cat in her style while they followed along. A cat face for Kinders, and a whole cat body for the 1st graders. They added their own patterns inside of the cats and colored them in with crayons. Paint was used for the rest of the cat and the background
Subscribe to:
Posts (Atom)