This is my second year of teaching and my first time attempting to make Art Club t-shirts. I'm also embarrassed to say, this was the first time I tried tye-dye. Ever. I bought a kit from Michael's that had 4 different colors. I definitely kept adding water to the mixture to make the colors last for all the shirts I had to do...almost 30. Eeeks! Because it was such a messy ordeal and I didn't want to waste any of the precious colors, I pulled the kids aside in groups and had them choose 2-3 colors and let them watch the process. They were rinsed and hung to dry in my uncle's garage. The next week I made an EMY Art Club stencil from thick poster board. It was placed on each shirt and the kids took turns filling in the letters with black fabric paint. I was super proud of the results but boy was it time-consuming and a lot of work...haha. Seeing them rock these all year around school will do my heart good. I have two separate groups of students meeting on Tuesday and Thursday every week. Below is my Tuesday's group. Aren't they cute?
Sunday, October 18, 2015
Alma Woodsey Thomas Paper Designs
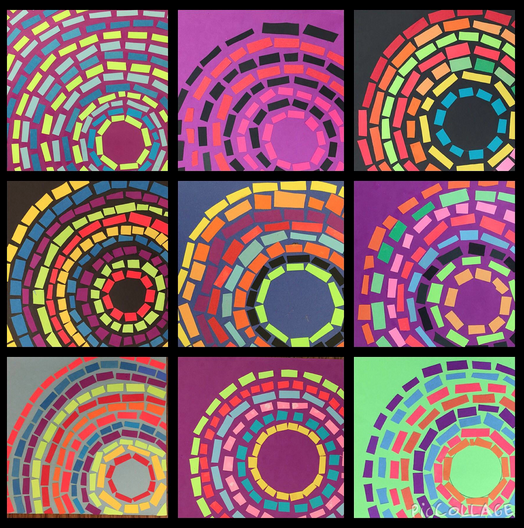
We started out Art Club this year by talking about the art of African-American artist Alma Woodsey Thomas. She recently became a favorite of mine because of her long career as an art educator and love for children. Her works are both intricate and colorful and so much fun to look at. The students made their own unique designs out of pieces of paper. "The Eclipse" was our inspiration. We started by choosing any color background. They then traced the inside of a masking tape roll in the corner of their paper. This was used as a guide for them to start making rings. I gave them free reign with the color choices and patterns. Cutting their pieces the same size for each ring was encouraged as to keep the circle from becoming misshapen. This project can be time-consuming but totally worth it!
"The Eclipse" by Alma Woodsey Thomas
Wayne Thiebaud Gum Ball Machines
Students learned about the artist Wayne Theibaud and his famous dessert paintings. For this project, we were inspired by his gum ball machines. The first day was spent printing different colored gum balls onto a white circle. To create ours, we used some cute circle sponge printers I found at Michael's that worked PERFECTLY. I passed out a small dish of paint on each table with 2-3 sponges each. Each table had a different color to start with and then they were rotated around so that eventually all colors were used by each student. For each color they did 4 balls. I had to really emphasize sharing and waiting their turn. Surprisingly, they handled it super well. The next day was spent constructing our gum ball machines with pieces of paper. I demonstrated which piece went where. The last step was giving them a Sharpie and having them write 25 cents on the front.
Rainbow Lines
I saw this project on Pinterest and thought it was such a great idea! The little one's learned about ROY G. BIV and then we painted rainbow stripes together. I made sure to have them go over their colors twice to make them super bright. These were set out to dry. The next day we read the book Lines That Wiggle and practiced cutting the different types of lines that we saw on scrap paper. When I began to see improvement, we drew out the different types of lines on the back of our rainbows and then cut them out slowly and carefully. Those pieces were glued onto a black sheet of paper like a puzzle with spaces in between each section. I reminded them to match up the colors.
Subscribe to:
Comments (Atom)


