I've dreamed of doing this for awhile now and to make it happen makes me so happy! I bought a huge piece of sturdy but thin board at a local art shop and sketched out a huge color wheel on the front. I then put my Art Club to work, mwuahahaha! I asked the school staff to donate any magazines they had laying around and added them to my already growing collection. The students went through them and cut out all the different color combinations they could find. We started with filling in the pure colors first (red, orange, yellow, green, blue, violet) and moved on to the blended colors afterwards. It gave them a better eye at naming colors and looking at pictures in a new light. Some colors were harder to find than others for sure. For example, we really lucked out at finding greenish-yellow but had to really hunt for reddish-purple and reddish-orange. I did most of the work modge-podging the cut pieces together in each section, and believe me, this took weeks. The border and back were painted black, since I didn't feel the brown made the colors pop. I'm thrilled to have this piece in my art room for students to gain inspiration. It's fun to look closer and see the objects and characters in each section :)
Showing posts with label art club. Show all posts
Showing posts with label art club. Show all posts
Tuesday, March 22, 2016
Tuesday, December 29, 2015
Clay Farm Animals
Art Club post! I have a very limited amount of clay this year, definitely not enough for a whole grade to use. So, I decided Art Club would be the perfect group size to make use of it! I decided making cows and pigs would be super cute. I used my document camera to show them how to build them using the scratch and score technique. This took them about an hour to complete because they were really trying to show good craftsmanship! The next week we used tempera paint to paint them in. This was air dry clay so we did have some issues with parts falling off occasionally so I kept my glue gun handy. In the end they came out oh-so adorable and thankfully, in one piece.
Sunday, October 18, 2015
Art Club T-Shirts
This is my second year of teaching and my first time attempting to make Art Club t-shirts. I'm also embarrassed to say, this was the first time I tried tye-dye. Ever. I bought a kit from Michael's that had 4 different colors. I definitely kept adding water to the mixture to make the colors last for all the shirts I had to do...almost 30. Eeeks! Because it was such a messy ordeal and I didn't want to waste any of the precious colors, I pulled the kids aside in groups and had them choose 2-3 colors and let them watch the process. They were rinsed and hung to dry in my uncle's garage. The next week I made an EMY Art Club stencil from thick poster board. It was placed on each shirt and the kids took turns filling in the letters with black fabric paint. I was super proud of the results but boy was it time-consuming and a lot of work...haha. Seeing them rock these all year around school will do my heart good. I have two separate groups of students meeting on Tuesday and Thursday every week. Below is my Tuesday's group. Aren't they cute?
Alma Woodsey Thomas Paper Designs
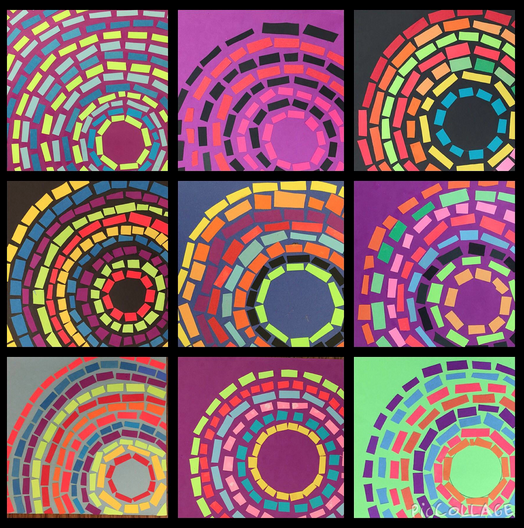
We started out Art Club this year by talking about the art of African-American artist Alma Woodsey Thomas. She recently became a favorite of mine because of her long career as an art educator and love for children. Her works are both intricate and colorful and so much fun to look at. The students made their own unique designs out of pieces of paper. "The Eclipse" was our inspiration. We started by choosing any color background. They then traced the inside of a masking tape roll in the corner of their paper. This was used as a guide for them to start making rings. I gave them free reign with the color choices and patterns. Cutting their pieces the same size for each ring was encouraged as to keep the circle from becoming misshapen. This project can be time-consuming but totally worth it!
"The Eclipse" by Alma Woodsey Thomas
Subscribe to:
Posts (Atom)


